What do these two images have in common? I see both as a form of artistry.
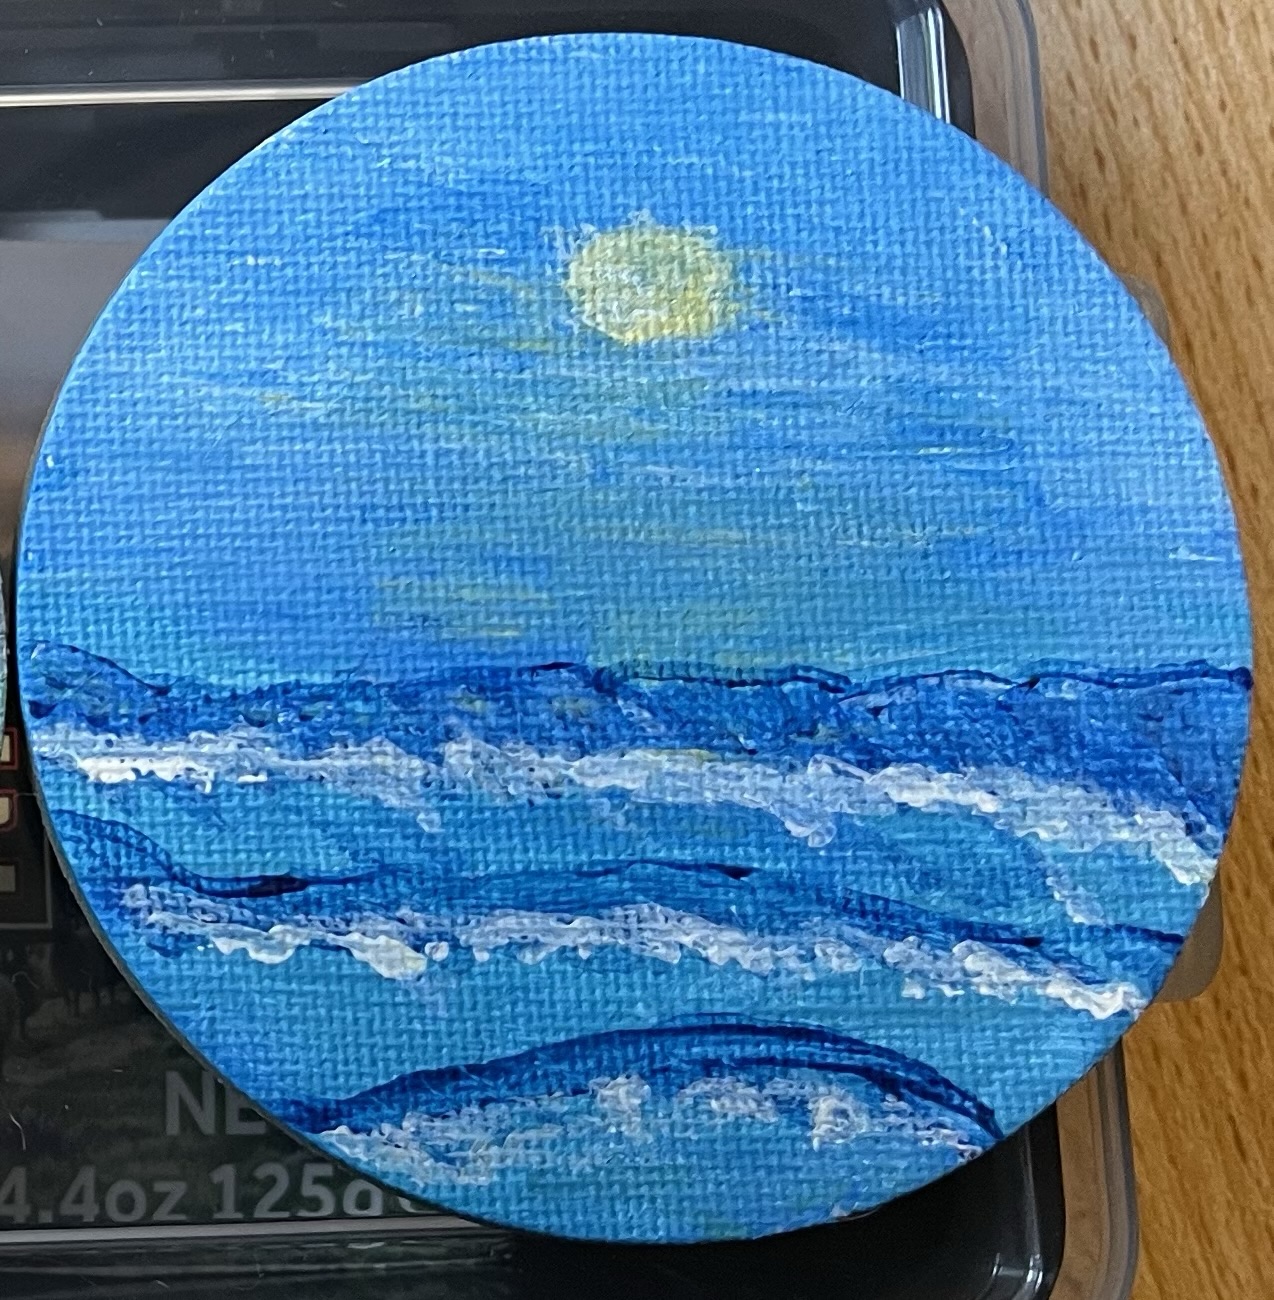
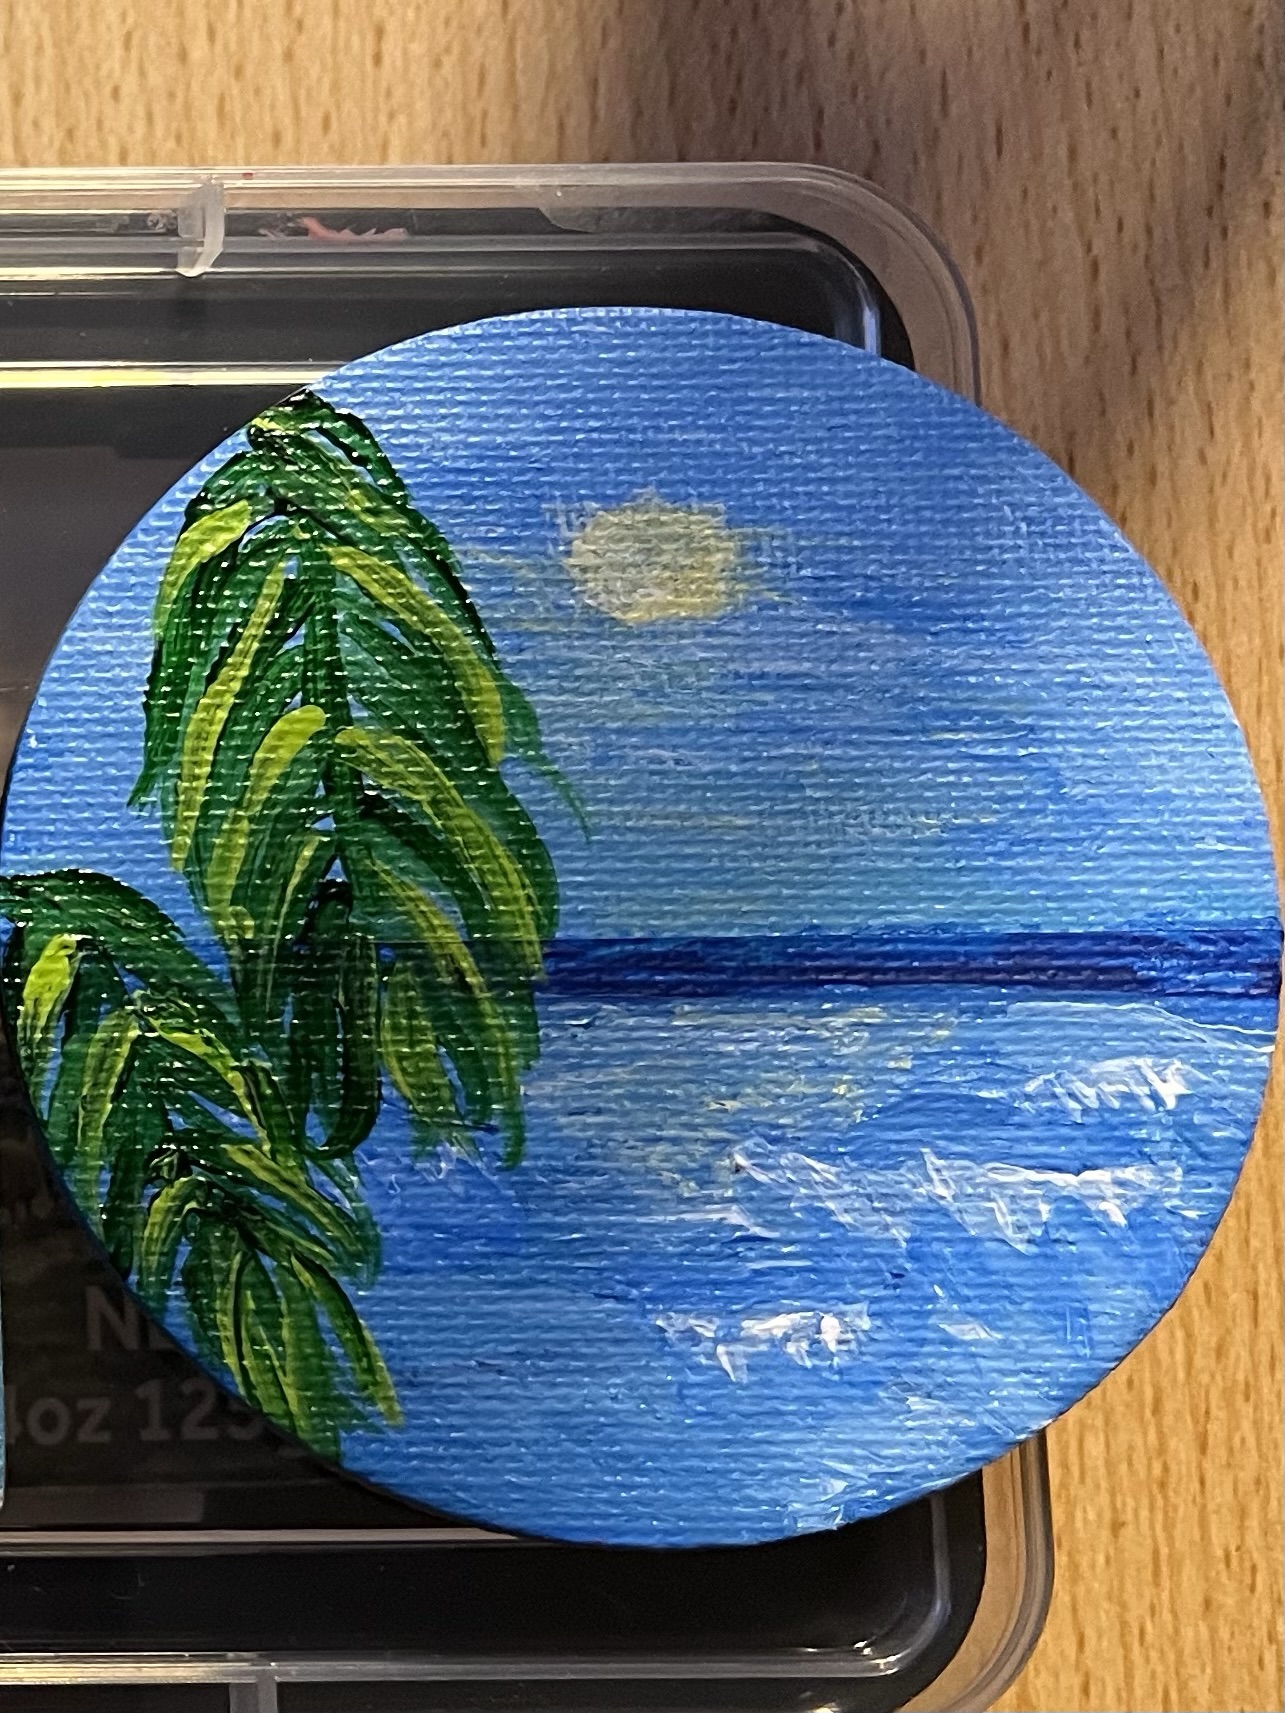
The paintings are self-explanatory. I think it’s safe to say that everyone views paintings as art. Above are small two-inch paintings that took me approximately an hour each to complete. I can now say I’m much better at blending colors, particularly blues, than I was. My palm fronds and suns are also improved since last week. Not perfect but heading in the right direction.
See the two seascapes above? They are the same painting. I wasn’t happy with it, so the next day I went back and redid it. In the first version, I intended to paint waves, but I couldn’t decide if it looked like mountains or waves. I painted over the bottom half then made a different horizon and new waves. Then I added the palm branches in the foreground to give the illusion of depth. (Thank you, YouTube videos!)
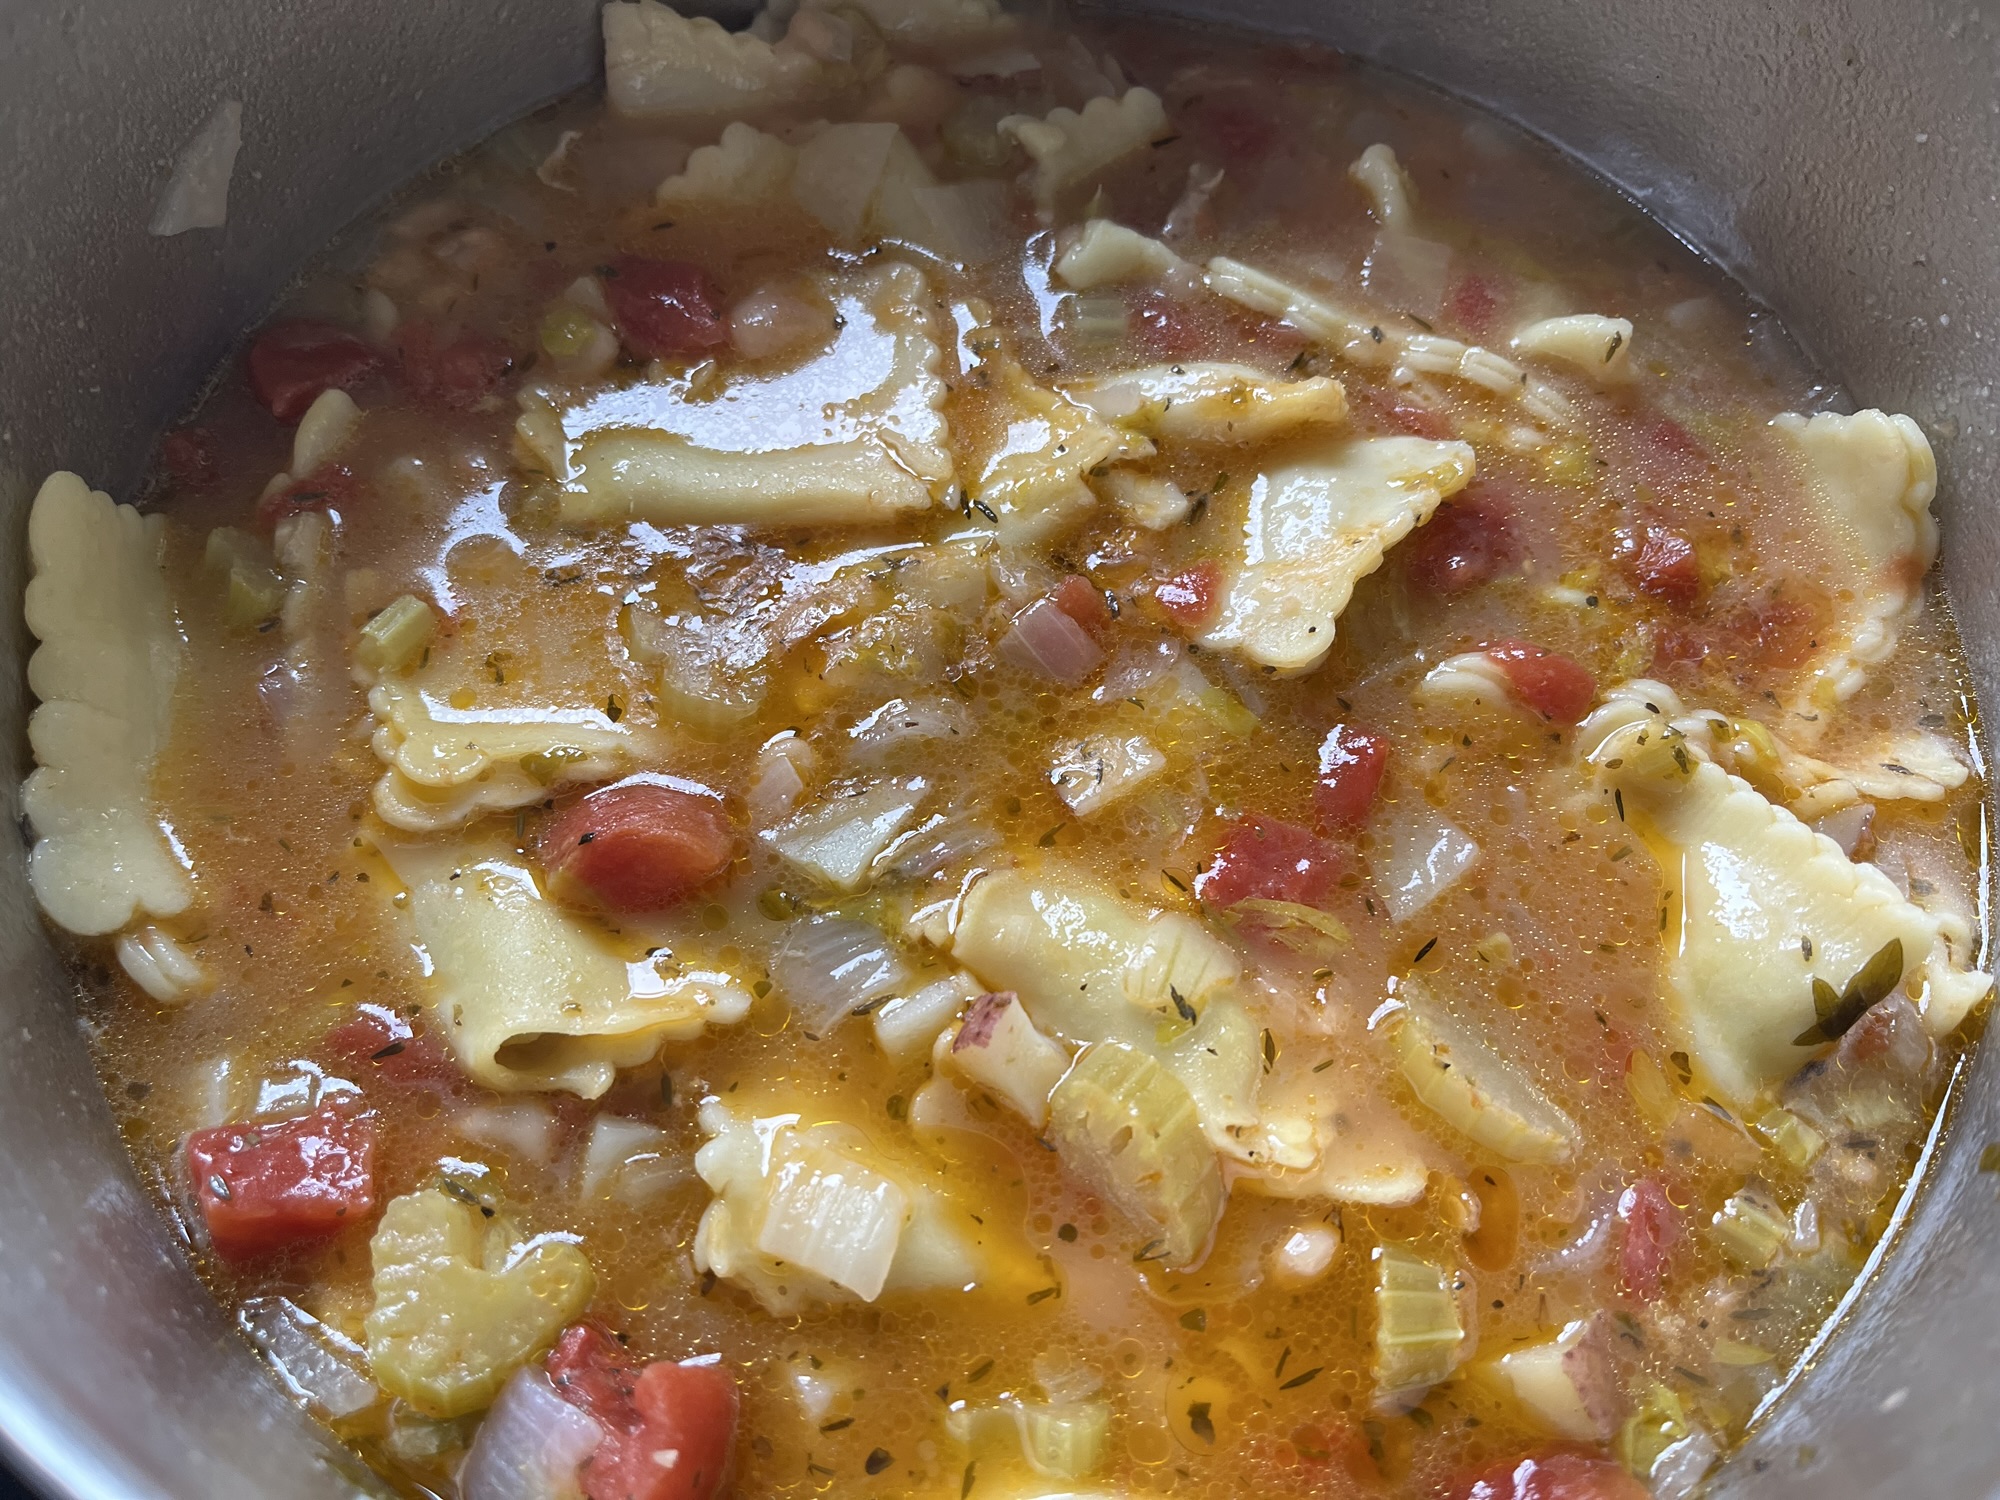
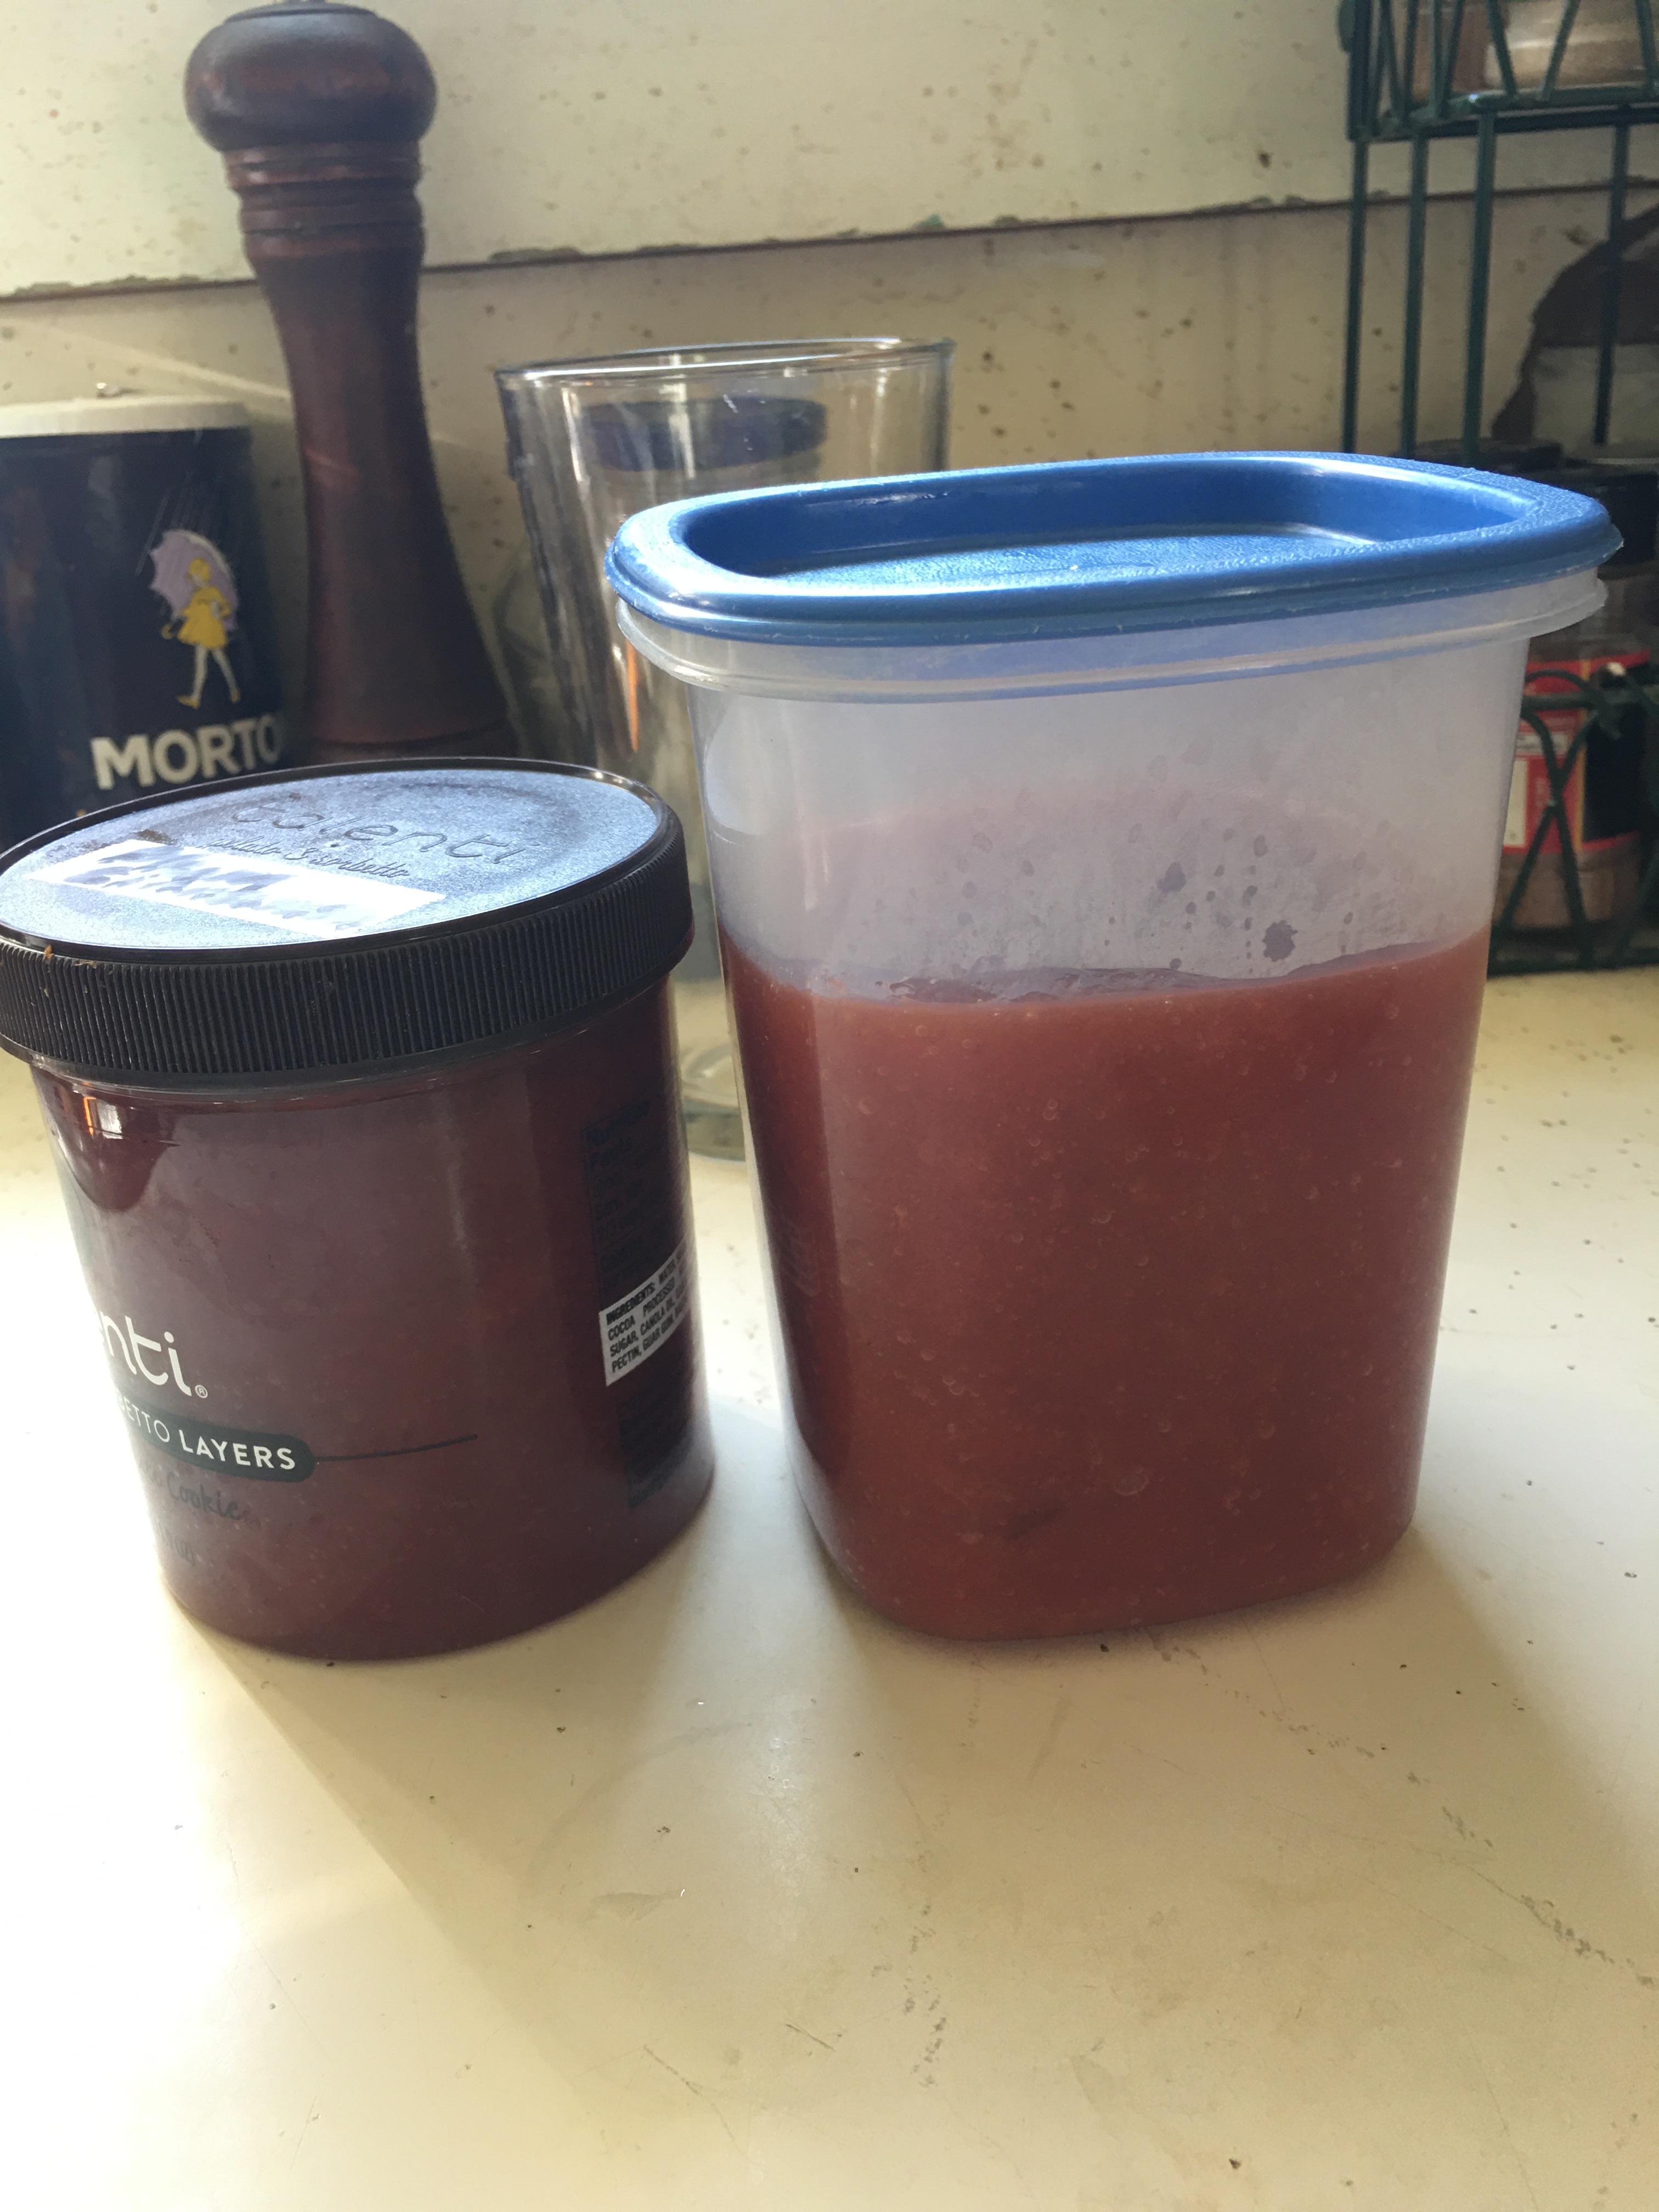
So, how does this all relate to soup? Well, I don’t generally cook with recipes, I just create and make adjustments as I go. I started with homemade broth. I keep a “soup sack” in the freezer that I add to whenever I have anything that I think would make good broth. The first ingredients I added to the soup pot were onions and celery. I decided to also include minced garlic to add another layer of flavor. Always use fresh garlic, never jarred. There is a world of difference. I added white beans, minced red skin potatoes, and spinach-ricotta dried raviolis. Just as in the painting that wasn’t quite right, neither was the soup. In went a can of diced tomatoes. Then it was time to add the details, the spices. Salt, pepper, and thyme. Still not right. I added a mix of marjoram, oregano, basil, and garlic powder. You may think the minced garlic would have been enough. The powdered garlic gives another level of depth. Just like painting where all shades of blue are not the same, neither are forms of garlic.
I think that cooking and baking are art forms. You can cook for subsistence, or you can cook a thing of beauty. The beauty may be in the taste or the presentation or both. In art you can make shapes and figures to get your point across or you can go in for the details. The details can elicit emotion, show beauty, or both. The level of involvement is up to you. There is a place in this world for both things.
Of course, when creating you are never likely to come up with the exact same thing twice. When painting, this is a good thing. When cooking, I’m not sure. When someone asks me for a recipe for a dish I have made, or even what it is called, I am at a loss as to how to respond. This usually results in said person looking at me like I have two heads until I just start reciting a list of ingredients. Oh well, such is life!
Like so many of you, I enjoy cooking, but the real problem is deciding what to make. So, after my trip to the grocery stores yesterday, I decided to come up with a menu for the week. And yes, that is grocery stores, as in multiple. I have three that I frequent to take advantage of the sales and the best products. One store may have a better price on some things, while another store may have a product that I consider to be of better quality. By the time I drive into town, hit all three stores, and drive back home, it usually takes me about two hours. Then add in my others stops that vary by week such as a trip to the library, the dollar store, or a thrift store and I’m looking at three hours. (Don’t tell about the stops I make at Dairy Queen for a Blizzard! The Reese’s Peanut Butter Cup Pie Blizzard is my new weakness.) On to my menu, and these are in no particular order. I pick whichever I am in the mood for or have time to make.
Hamburgers, Sweet Potatoes, and Salad This is one for an evening when I am pressed for time. -I keep a bag of hamburger patties in a bag in the freezer. When I buy a bulk package of beef, I form all of it into decent size patties and freeze. I freeze it all this way, knowing that if I want beef for something else, I can just thaw out as many patties as I need and use it for something else like chili. I never buy ground beef that is less than 80% lean. I feel like, what’s the point because there is so much loss of grease. (I have a veggie patty for myself because I don’t eat meat aside from seafood.) –For the sweet potato, I may just microwave it, or I may peel, dice, and boil, then add butter and brown sugar with a pinch of salt. -I think the salad is self-explanatory. I like to buy bags or tubs of salad mix from the markdown shelf and then extras to them.
Stir-frywith Shrimp, Jasmine Rice, and Egg Rolls -I start with a bag of Asian medley vegetables from the freezer section and add other veggies of my choice to bulk it up and add more flavor. I prepared this item from the menu for last evening’s dinner. Always I start with a clove (or two!) of garlic and an onion. Yesterday, I also added quartered fresh mushrooms, a container of Napa cabbage, and some sliced peppers of assorted colors. I added in the bag of Asian medley last. Sometimes I’m not so creative and just use a frozen bag of broccoli to bulk it up. I do try to stick with vegetables grown in the United States because we have more regulations regarding the safety of food as it’s grown than some countries. -When I make stir-fry, I use Jasmine rice. It has a more delicate flavor than regular long grain rice. I keep three types of rice on hand that I use with different dishes, because I notice the difference and do not think one rice suits all. These are: long grain rice, Jasmine rice, and brown Basmati. These cover most of my needs. -For the egg rolls I almost always use fresh or frozen pre-made ones. I have made them from scratch before and they are just too much work. We don’t always have egg rolls with our stir-fry but it does make the meal seem fancier. -The shrimp for this meal was frozen, breaded from the supermarket. I could bake it along with the egg rolls which helped with time. If I cook the shrimp from fresh or use chicken, I cook it in the pan and set it aside, before sautéing the veggies. –Usually, I make my own sauce, but this time I cheated and used orange ginger sauce from a jar.
Pasta with Mid’s Spaghetti Sauce, Meatballs, and Cheesy Bread -This is another easy one. Cook pasta of your choice. -Heat jarred sauce. We really like Mid’s. -I keep purchased meatballs in the freezer, ground beef and vegetarian. I just put them on a plate and microwave them. -What really jazzes this meal up is bread from the bakery. They make a cheesy Asiago bread that is amazing! -We also always have a block of Romano cheese in the refrigerator for grating on top.
Chili with Cornbread -Just canned tomatoes and beans (either kidney, pinto, black beans, or a combination), garlic, onions, peppers, and spices. Sometimes I add in corn or hominy, and a square of baking chocolate really adds a depth and richness. At this point I split it in half and add ground beef to half and vegetarian crumbles to half. -I love cornbread! I use a recipe from my mom’s church cookbook. I make it with Bob’s Redmill medium grind cornmeal as I like it to have some texture.
Chicken Breast, Oven Fries, Green Salad with Grapefruit, Avocado, Pecans, and Cheese -I keep a homemade breading mix in a Ziploc bag in the freezer. I coat the chicken and put it on a baking sheet. For myself, I pull vegetarian “chicken” from the freezer. -I make oven fries from whole potatoes that I cut into wedges, brush with olive oil and add to the baking sheet. I salt them when they come out of the oven. I can taste the salt better that way without adding extra. Truth be told, I will be using prepared frozen potatoes from a bag this week, because one of our grocery stores had them on sale for 99 cents a bag. Not as healthy but too good a deal to pass up! -I bought an entire bag of grapefruit recently so I got on Pinterest and looked up grapefruit recipes. I found this one with greens, grapefruit, sliced avocado, pecans, and cheese that looks good. I’m making just one change. My husband is not a big fan of the goat cheese that it calls for so I will substitute mozzarella. And I may toast the pecans, because after splurging on them, I want them to be as tasty as possible.
Pierogies with Peppers, Onions, and Chicken Sausage This is by far my easiest meal of the week. Boxed perogies, with sautéed onions and peppers. The chicken sausage will be cooked with the peppers and onions, then the perogies thrown in for a little browning. Grated cheese on top gives it a little pizazz.
You may notice that this is only six meal choices for the week. That’s ok. There are bound to be enough leftovers from all these meals to have for dinner one evening. I also try to make enough food that we have leftovers for lunch the next day. If we run a little short for lunch and only have enough for a side, I just throw in a quesadilla or a fried egg sandwich. We also have desserts which I usually make, but that’s for another time.
I hope you are able to glean some meal ideas from this list. I don’t always make a menu list, but it is nice to be able to hand it to my husband as dinner time approaches and say, “pick one”. It’s easier for me when I don’t have to think about it as well. Happy cooking. And happy eating!
This photo sums up a large part of the reason why I have been behind on posting my lists of books read. Watering, weeding, fertilizing, pruning and deadheading. That’s why. With this post I will be caught up. At least until the calendar flips at the end of the month. So follows my list of books read for July.
Forever and a Day-Jill Shalvis
Grace Brooks arrives in Lucky Harbor to figure out what will make her life happy. Answering an accidental call from Dr. Josh Scott, she agrees to be the dog walker and then temporary nanny to his five year old son. Grace takes care of the son Toby and paraplegic sister Anna. Grace is there for Josh too. Some families are built rather than born and they are worth the work.
2. Send a Ranger-Tom Habecker (Non-fiction)
A summary of a 32 year career as a ranger serving the National Parks system. From Washington D.C. to Gettysburg, then Yosemite to Glacier to Denali National Park, it was quite a career. The book covers day to day functions such as maintenance, law enforcement, and rescues. The author also shared the beauty and grandeur of the scenery and wildlife. It was interesting to hear what the life of a ranger is really like.
3. OMFG, Bees!-Matt Kracht (Non/fiction)
A hand-illustrated guide with everything you ever wanted to know about bees. The drawings are adorable and the information is presented in a lighthearted, funny way.
4. Ruby Spencer’s Whisky Year-Rochelle Bilow
Ruby quits her high-powered job and moves to Scotland for a year to write a cookbook. She rents a tiny cottage and helps with cooking at the adjacent local pub to help pay her rent. Ruby becomes part of the local community and feels that she has come home, especially after meeting a village Scotsman. It was fun being immersed in this bit of Scottish life.
5. The Café at Beach End-RaeAnne Thayer
Meredith Collins is trying to get her life in order after her ex-husband swindles many people out of their retirement savings. Most people feel she was involved even though she was as surprised as everyone else. Meredith moves from Chicago to a small beach cottage she inherited from her grandmother. It’s all she has left. Her estranged cousin Tori still lives nearby. Her undercover neighbor is looking for clues as to where Meredith’s ex-husband hid the money before he died in prison. Lots of storylines going on here. It made for an enjoyable read.
6. Subpar Parks-Amber Share (Non-fiction)
This book is humorous, informative, and has nice graphic art. Each of America’s National Parks has a chapter starting with the worst and most humorous review. Ie. Crater National Park,”Just something to look at and leave”. I think some people should just stay home. I thoroughly enjoyed the book and learned a lot about our parks.
Magazines: Dogster, Cottages and Bungalows, The English Home, AARP, Country Living, Down East
Yesterday’s vegetables!
This picture also illustrates the comment about why I am behind with posting my book lists and posting in general. I gave about half of these away to my daughter and mother-in-law. This evening, we are having sweet and sour eggplant with peppers and a few green beans served on Jasmine rice for dinner.
I keep four different varieties of rice on hand. Jasmine, brown Basmati, long grain, and short grain. They all have a different taste and texture that makes them preferable for different dishes. Sometimes, I buy long grain and wild rice too. Not bad for a girl whose only exposure to rice growing up was the occasional Minute Rice for our canned La Choy “Chinese food”. My tastes have expanded from when I was growing up and our winter vegetables consisted of canned corn, peas, or green beans. I don’t think our family was all that unusual for the times. The variety of foods that we have now were not as readily available then. At least not where I lived. This may be part of the reason I enjoy growing and cooking such a wide range of things now.
My friends, I hope you are enjoying the bounty of summer as well. Until next time…Peace be with you.
You may notice lots of ice cream “cookbooks” this month and next month too. I bought an electric ice cream maker and am trying to perfect the art of dairy free ice cream. I can eat dairy products with no problem and the regular ice cream recipes I have tried turned out pretty well. Not everyone in my family is so lucky, so I am seeing if I can conquer the lactose or dairy free versions. I tried making the regular versions just substituting almond milk and coconut milk. It just didn’t work. The product had good flavor but was so hard, it was basically a block of ice milk. Back to the drawing board.
I did make time to read some other books in July too. Some days it was hot enough that I refused to go outside in the afternoons. Reading is always a better option when it’s more than 90 degrees outside!
From Strength to Strength-Arthur C. Brooks (Non-Fiction)
I picked this book up because on the cover it says, “Finding success, happiness, and deep purpose in the second half of life”. Sounds perfect for someone (me) who retired a couple years ago, right? I am sorry I spent my time reading this book. The book spent a major portion of it telling me how people suffer a professional decline and lessening abilities as they age. Then it cited numerous examples of such. By the end, I was feeling pretty incompetent. The last couple of chapters do offer some good advice, but I did not find it to be worth the effort.
2. One Italian Summer-Rebecca Serle
I enjoyed this book. After the death of Katy’s mother, she takes the trip to Italy that they had planned to take together. Katy’s mother was her best friend, and she is lost without her. While she is there Katy becomes friends with…her mother who is 30 years younger. Katy gains insights into her mother’s life and actions that she never expected. She also learns a lot about herself. Normally, I don’t like books that bring fantasy into real life experiences, but I did enjoy this one. I do like books in the fantasy genre that occur in different worlds. Just my quirk.
3. The Heron’s Cry-Ann Cleeves
British Inspector Matthew Venn and his detectives have their hands full trying to solve this case before there are more murders. The book requires close attention to detail to keep up with the plot but is well worth it. Artist Eve keeps discovering bodies that have been killed with broken pieces of her glasswork. The first body is that of her father. They are also a few suicides that make us wonder just what is going on here. I couldn’t figure out who did it until very near the end.
4. Icebox Pies-Lauren Chatman (Cookbook)
Many delicious looking recipes but I am unlikely to make any of them. Most involve heavy cream or other sources of dairy and we have multiple lactose intolerant people in our family as noted above.
5. Vice Cream-Jeff Rogers (Cookbook)
This is a book of vegan ice cream recipes. I am not likely to make these. Nearly all use maple syrup or honey dates as a sweetener and I think they overpower the other flavors. Also, the fruit based recipes call for a juicer which I do not have.
6. The Year of Magical Thinking-Joan Didion (Non-Fiction)
Joan Didion and her husband John Dunne were successful writers. They were married for 40 years before John’s sudden death from a heart attack. Both worked from home so they were near constant features of each other’s lives. Their only child went into a 2 month coma 5 days before John’s death and then suffered from ongoing health problems.
7. The Heirloom Garden-Viola Shipman
Iris Maynard has been alone since her husband died in World War II and her daughter died from illness a few years later. After another traumatic event Iris walled in her yard hasn’t left for years. A troubled family rents the house that Iris owns next door to her own. The stipulation is they are to have no contact with Iris. Children have minds of their own, so this ends up being impossible. Iris is a retired botanist and the family loves flowers and gardening. A story of how we are better together than alone. A moving and enjoyable book with a bit of science thrown in.
8. The Southern Vegetarian-Burks & Lawrence (Cookbook)
Many of these recipes look delicious but they are more work than I am willing to put in and I am not a lazy cook. I did get some ideas for meals that I will put my own spin on to make them easier.
9. Melt, Ice Cream Sensations to Make at Home-Claire Kelsey (Cookbook)
The recipes in this book are complex and most use unusual ingredients. I am never likely to make them. That being said, check this book out! It is fun and the pictures are beautiful. I also enjoyed reading about how the author’s food truck that sells ice cream came into being.
10. The Friendship Pact-Jill Shalvis
Tae Holmes and her mother tell each other everything except for one very big secret her mother has kept hidden. The secret has the potential to change everything. Tae is also distracted by the sudden appearance of Riggs, her first fling way back in high school. Riggs turns out to have her back. Always.
Sorry for some less than positive reviews this time, but hey, you can’t like them all.
My recommendation from this list is The Friendship Pact if you want a good beach read type of book. You can never go wrong with Jill Shalvis. If I see her name on a book, I will pick it up. If you are looking for a book to make you think, go for The Heron’s Cry.
I baked this cake yesterday. I was feeling lazy, so I used a box mix and added things to it to use up a bunch of leftovers, which made the result even better!
Ingredients for Cake:
1 boxed cake mix, vanilla flavored
3 eggs
1/2 cup oil
1 cup water, part juice from pineapple
3 ripe bananas
1 cup or half a can crushed pineapple
Blueberries, about a handful
Add the cake mix, eggs, oil, and water/juice and mix. The eggs, oil, and water were to make the mix per package directions on the box I used. Use juice from the pineapple and top with water to make 1 cup of liquid.
After mixing the above ingredients for about a minute, add the bananas, mashed if using fresh.
Also add the pineapple now. Mix for another minute.
Fold in the blueberries by hand. If you add them to the mixer, you will end up with blue batter that turns grey as it bakes.
Split the batter among two greased 9″ cake pans. Bake per package directions. (Usually, 350 degrees in a pre-heated oven for about 25 minutes.) You will have to add another 5-10 minutes to the baking time because of all the additions to the batter. Start checking with a toothpick at the listed time and check in 5-minute increments thereafter.
When done, remove from oven and cool in pans for 15 minutes. Loosen and remove from pans, or you can put them back in the pans to finish cooling. Let the cake layers cool completely before icing.
Ingredients for Icing:
1 stick butter, softened
1 teaspoon vanilla
2 oz cream cheese, softened
2 1/2-3 cups Confectioner’s sugar, sifted
1-2 Tablespoons milk, or almond milk
Beat butter, cream cheese, and vanilla with a mixer.
Add Confectioner’s sugar by half cups, until incorporated.
Add 1 Tablespoon milk. Add as much milk as needed to reach desired consistency.
Assemble the cake with frosting in between the two layers. I spread some melted orange marmalade onto the surface of the bottom cake before adding the frosting, for some extra pizzazz. Ice the rest of the cake and voila!
Notes:
I used a vanilla cake mix, but you could also use white, yellow, or even spice cake mix. Any flavor that tastes good with your extra add-ins will work.
My add-ins were bananas, pineapple, and blueberries. Use whatever you have available. Applesauce, apple slices, and pecans. Oranges, bananas, coconut. Zucchini, walnuts, and cranberries. You get the idea. I work with whatever is in my freezer and pantry.
I always freeze my bananas just before they get too ripe, so I have some for baking when I need them. I keep them in a large Ziploc bag and take however many I need out. I microwave them and they are pretty soupy by the time I use them. If yours aren’t frozen, you will want to mash them before adding to the batter. This allows me to bake whenever I want to, and have the time to, rather than having my schedule dictated by the state of my bananas!
I always put the cake layers back in the pans to cool, so I can move them around the kitchen. This is helpful because our kitchen is small, and we cook a lot. It also makes it easier to move the cakes to hide them from counter surfing dogs and cats!
Bonus tip-I find it much easier to frost a layer cake if you can put it on a lazy-Susan, or rotating cake platter for frosting. The icing comes out nice and smooth with this method. I also get smoother results with a metal butter knife vs. a silicon spatula.
I would love to hear what kind of goodies you add into your cakes! Feel free to share them in the comments. Also, you can sign up to get notifications of new blog posts at the top of the page.
Hey, all! Hope you are surviving this snowy, cold snap that is hitting across so much of the country. We got about 14 inches of snow at the beginning of the week, and last night’s low was -6 degrees. We are in northeast Ohio, so this is not that unusual for us. I watch the weather on television and see many of you in other parts of the country are getting slammed with similar weather that is not the norm for your areas. Take care out there!
Today, it’s time for another recipe and cooking post. This one features green lentils. I never used to be a fan of lentils. Since I discovered various types of lentils besides the standard brown ones, and I am learning better ways to cook them, I have a new appreciation. So, here is a recipe I invented to incorporate some healthy lentils into our diets.
Chopped garlic, onion, and red pepper.
Ingredients:
1 large garlic clove, minced
1 medium onion, diced
1/4 of a red pepper
handful of baby carrots, finely diced
1-2 Tablespoons olive oil
1 teaspoon salt
1/2 teaspoon black pepper
1/2 teaspoon garlic powder
1/2 teaspoon onion powder
1/2 teaspoon basil
1/2 teaspoon thyme
1 can diced tomatoes (any flavor, fire roasted is especially good)
2 cups any flavor of broth (or water with a bouillon cube)
1 cup green lentils
Directions:
Heat olive oil in a 12 inch skillet. Add garlic, onion, red pepper, and carrots.
Sauté all until tender. Covering with a lid helps keep the veggies from burning before they are ready. Stir occasionally.
Remove lid when veggies are tender. Add black pepper, garlic and onion powders, basil, and thyme. Sauté 1-2 minutes more.
Add broth, or water and bouillon, and bring to boil while stirring occasionally.
Add the lentils and canned tomatoes. Simmer, covered until lentils are tender. Approximately 30 minutes. You may need to add more liquid as the lentils cook. Water is fine for this.
Voila! Dinner is served.
Serving Suggestions:
Serve on rice. Basmati is a good choice, but any rice will work.
Melt cheese on top for the last 5 minutes of cooking.
Stir in a little barbeque sauce or soy sauce for added flavor.
This made more than I anticipated, so after having it for a couple meals, I made the rest into veggie patties.
To do this:
Put leftover lentil mixture into a food processor or chopper and run until smooth. Pulse at first and then run for 30 seconds to 1 minute.
Add an egg, a bit of Parmesan cheese, and about 1/2 cup of Italian breadcrumbs. Process long enough to mix.
Form mixture into patties and fry in enough oil to coat pan.
You can melt the cheese of your choice on top.
Serve.
And after this, I still had a large lentil patty left, so I crumbled it up and used it as a topping for homemade pizza!
This recipe made a few meals for two people. And it lived on as incarnations in more meal ideas as well. The recipe was frugal and tasty. I’d count it as a winner. Let me know what you think. Don’t forget to follow my blog. I intend to include at least one recipe per month as part of my country living lifestyle page.
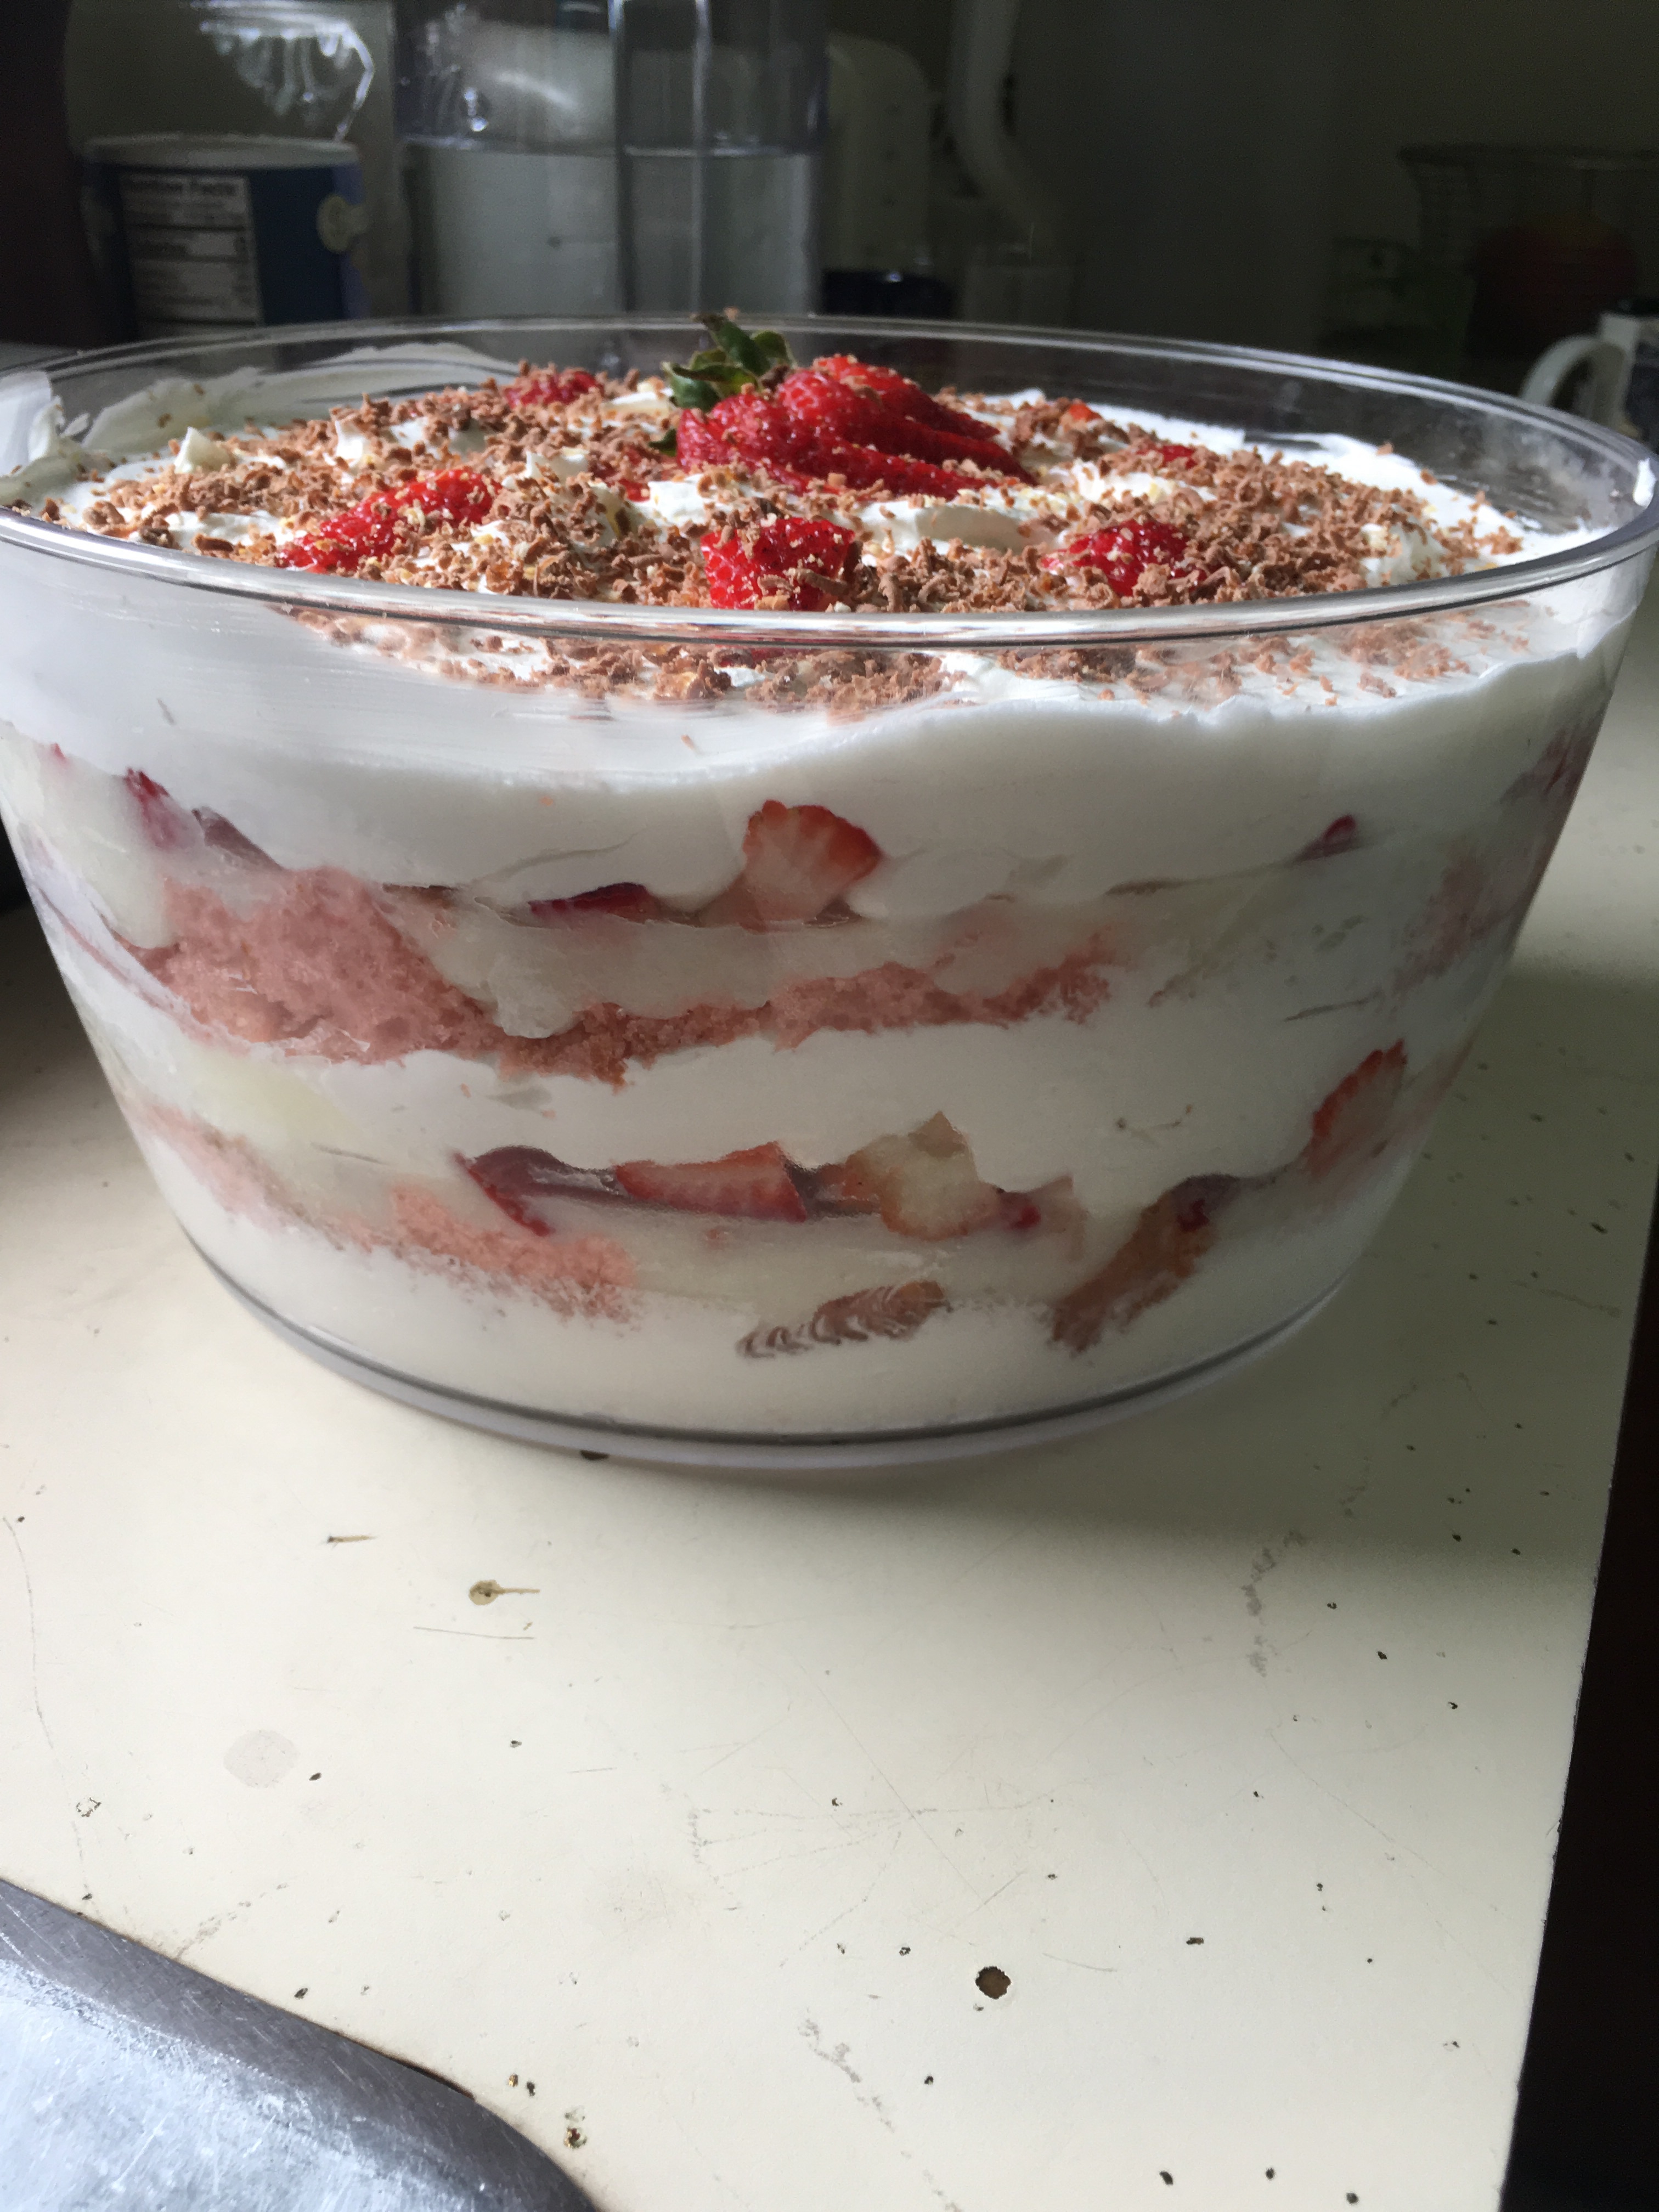
This blog post is for my niece Kara. It is her very favorite dessert, except for possibly cassata cake. Come to think of it, the desserts have essentially the same ingredients. She always requests this dessert and even asked for us to make it together when she spent the day here. She can eat more trifle than should be able to fit into a 50 lb. body! Must run in the family. This recipe is an original concocted by me.
Ingredients:
1 boxed white cake mix, prepared
1 lb. fresh strawberries, save a large one for garnish
1 1/2 tubs Cool Whip, regular or light, thawed
2 boxes instant vanilla pudding, 1.85 oz. each (4 serving size)
3 cups milk
chocolate for garnish (optional)
Directions:
Make boxed cake mix as per package directions. Bake it in a 9″ x 13″ pan. Allow to cool. Cut the cake into 1/2 to 1 inch cubes.
Prepare the pudding. Empty both boxes of the pudding into mixer bowl. Add 3 cups of milk and mix. The pudding will be a little thicker than usual. Chill for a few minutes.
Wash and hull the strawberries. Cut them into bite size pieces.
The trifle should be assembled in a clear glass trifle bowl for visual effect. I use the plastic bowl from my salad spinner since my trifle bowl cracked. The bowl is clear so works fine. It is used in the pictures here.
Spread a thin layer of Cool Whip to cover the bottom of the bowl.
Place a layer of cake cubes over the Cool Whip spread in the bowl.
Add a layer of the strawberries.
Spoon a layer of pudding over the strawberries.
Add a layer of Cool Whip.
Repeat until all ingredients are used up, making sure your top layer is Cool Whip. I always do the layers in this order. This allows any strawberry juice to soak into the cake and the pudding to run in the strawberry crannies.
I take the large, reserved strawberry and make slices, leaving it attached to the hull. Push the attached sliced so they spiral and place in the middle of the top dessert layer for garnish. (See photo above.)
Optional: Take a fine grater and grate chocolate directly on to the top of the dessert. You can use a Hershey bar or other chocolate. I used a Malley’s chocolate Santa left over from Christmas on this one. Use good quality chocolate.
Refrigerate until serving. I would say this serves about 10-12 people. Unless one of them is a trifle-loving niece, then it serves about 4!
Feel free to make substitutions! You can use any flavor cake. I like strawberry as pictured below. I have also used chocolate or brownies. Use different fruits as well. It will work with raspberries, blueberries, or peaches. I would avoid bananas because they might turn brown. You can also use different flavors of pudding. Mix and match ingredients as per your taste.
We hard a large harvest from one of our plum bushes this year! We purchased them from our County Extension Office as pencil sized twigs several years ago. The largest is now about seven feet tall. They are covered with sweet smelling white blossoms in the spring. I recently read that the type we have are called wild plums or sand cherries, among a few other names. They start to bloom after three years and produce fruit after four to six years. So we may have even more fruit next year if our other bushes kick in.
I made our first batch of plum preserves last week. I followed a recipe I found on-line which called for lime zest and juice to be added. I strained the final product through a colander which was a bit of work and had some waste. The result was tasty, if a little tart.
Just after that we went to our neighbor’s barn sale. She will be moving soon and was clearing out a lot of things. We will miss Shirley. She has been a good neighbor. And Zekie has certainly enjoyed chasing the geese off her pond. https://sanctuary-acres.com/2021/03/22/a-working-dog/ My husband and I had found a few items and were ready to leave the barn sale when we saw one last item we had to have. It was the colander type strainer with wooden pestle seen above. Our neighbor said she had used it for making applesauce. We knew that it would be perfect for making plum preserves!
I had four more pounds of plums from this week’s picking, so I made more plum jam this afternoon. This time I made plum cinnamon for one batch and the other was plum ginger with freshly grated ginger root. Both are delicious. I used the new strainer set up to remove the plum skins and it worked beautifully.
Two flavors of plum preserves.
I also made a peach custard pie this morning with peaches I purchased at a local farm stand. It was a productive day and I am happy we were able to take advantage of local produce.
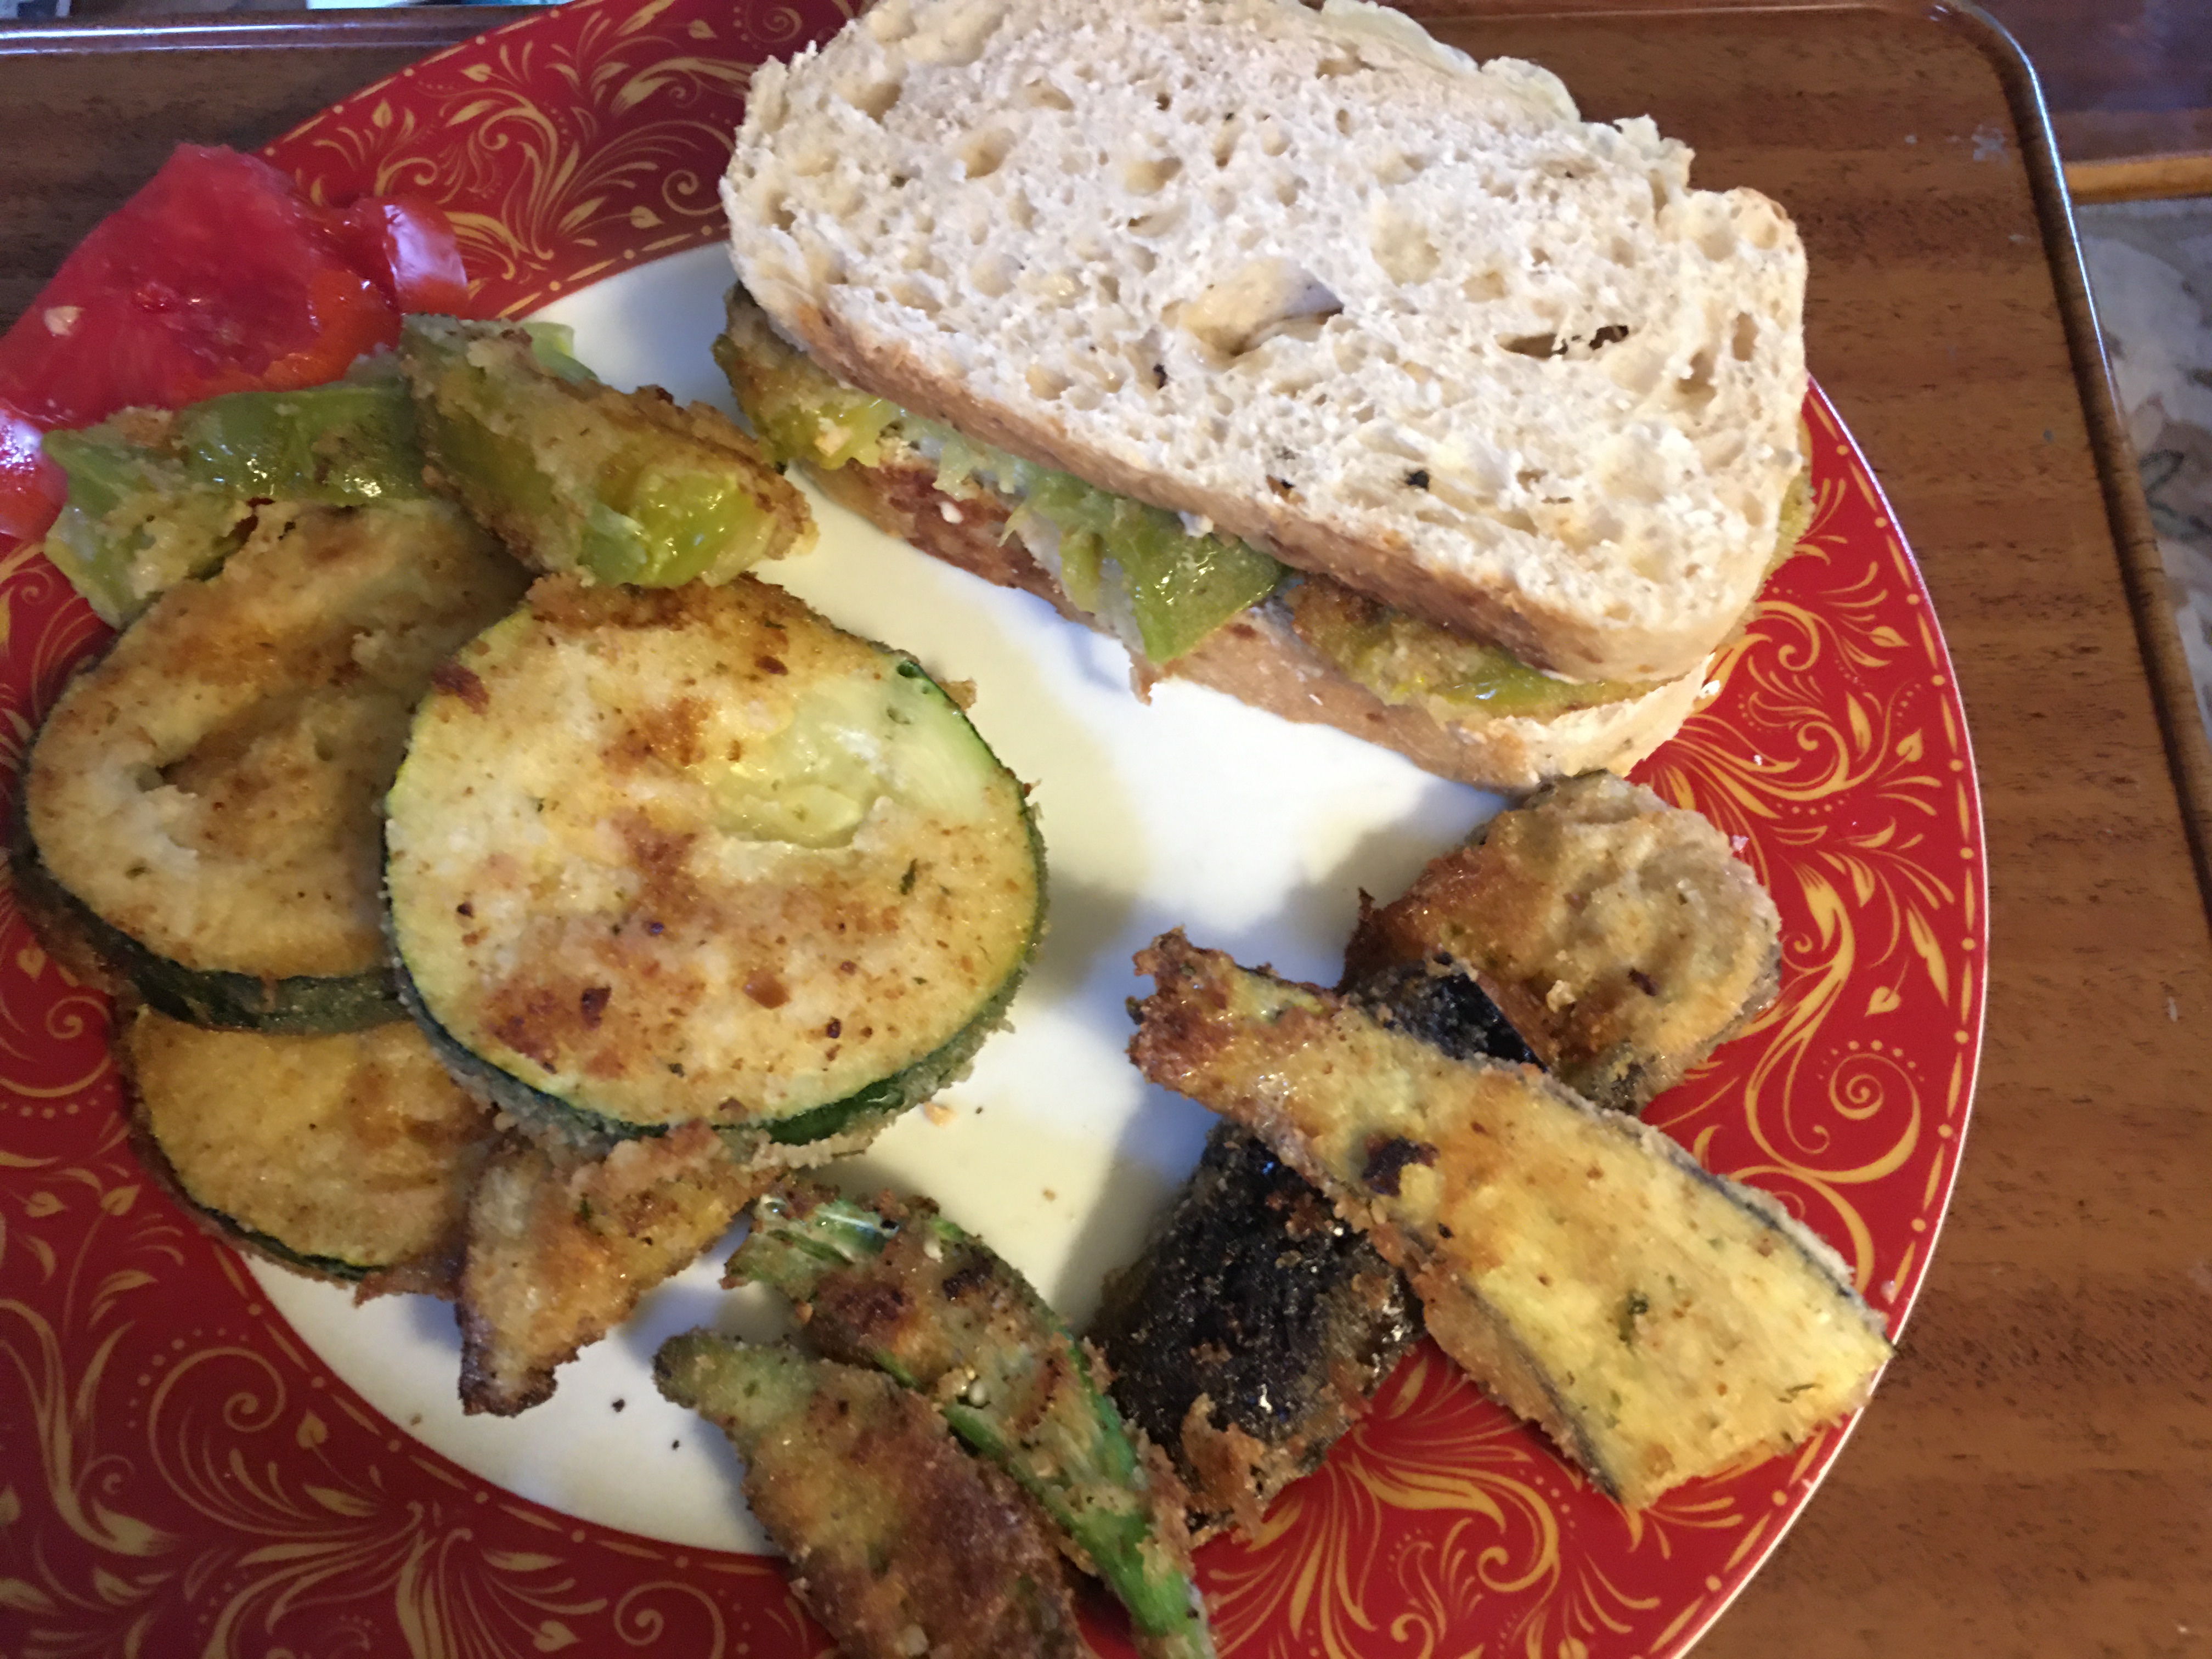
My meal this evening consisted of the following. The main entree was a fried green tomato sandwich with pine nut hummus and Lacey baby Swiss cheese on Asiago peppercorn bread from the bakery. My sides were all fried veggies from our garden. Some okra, a Japanese eggplant, and the obligatory zucchini. I did add a wedge of freshly sliced tomato too.
We go above and beyond on getting our daily allotted servings of vegetables in the summer. I haven’t bought vegetables from the grocery store in weeks. And we’ve been giving friends and family some of the excess which makes us popular.
We haven’t resorted to sneaking vegetables into strangers cars yet, but I can’t say I haven’t considered it!
I came up with this recipe a few years ago when we were inundated with turnips from the garden. There must have been 50 turnips, all ready for harvest at the same time. I learned my lesson. Now, I plant a short row of turnips and replant as I use them, so we have only a few turnips needing to be used at any one time.
Sautéed Turnip with Greens
Ingredients:
1/2 Tablespoon extra virgin olive oil
1 clove garlic, minced
1/2 teaspoon salt
1/4 teaspoon black pepper
1 medium turnip with greens,
Cut the end and top from the turnip. Discard end and set the greens aside. Peel the turnip and cut into slivers, or do a fine dice. Cut the greens from the turnip top and discard the top. Strip the tender greens from the tough part of the stems. You can just pull and strip them off with your hand in one fluid motion. Discard the stems. Hold the greens in a bunch on the cutting board and cut into long strips.
In a medium size skillet, heat the oil on medium heat until it swirls freely in the pan.* Add the garlic and cook until golden brown and crispy. Add the white part of the turnip and cook until tender and edges are browned. This only takes a few minutes. Add the greens to the pan and cook until partially wilted. Add more oil if needed. Be sure to flip the greens and stir in the garlic and turnip so they don’t burn on the bottom of the pan.
Add the salt and pepper. Continue cooking until the greens are fully wilted. They are especially tasty if you let the greens brown slightly. At this point, the dish is ready to serve. It holds well if you need to prepare other courses. Just turn the burner off and cover the pan. Let it sit on the burner to stay warm.
Serves 2-3 people.
Finished turnip dish.
*You may have noticed that I always mention heating the oil in the pan before adding the ingredients. This is an important step. Foods cook differently if they heat up along with the oil and it will change how the dish turns out. Also, some foods make stick to the bottom of the pan if they heat up along with the oil. You must, however, not let the oil get so hot that it smokes or it will burn your ingredients. Oil at the preferred temperature has a nice glossy flowing look to it as it swirls around the pan. It will also easily move around the pan and cover the entire bottom with ease.